Anterior cervical discectomy and fusion is a surgical treatment that minimizes or eliminates chronic pain in your neck due to disc disorders. Surgeons can use discectomy and fusion Atlanta to treat hand or arm weakness, numbness in their arms and extremities, degenerative or herniated discs, and other cervical problems that do not respond to medications or physical therapy. The surgery is termed anterior because your surgeon accesses the damaged disc through the front of your neck. The following procedures surgeons follow for a successful operation.
Preparation
Your surgeon will instruct you to lie on the operation table and administer anesthesia. Your neck is cleansed and prepped. If your bone will be used for fusion, the hip area is also prepared to get a bone graft.
Incision making
Your surgeon incises your neck on the left or right side. The surgeon moves aside your neck muscle to make a tunnel to your spine. The muscles supporting the front of your spine are held aside to allow your specialist to see the bony vertebrae and discs.
Locating the damaged disc
Using a fluoroscope, your surgeon will pass a thin needle into the disc to locate the affected parts. With the aid of a unique retractor, the surgeon spreads apart the vertebral bones above and below your damaged disc.
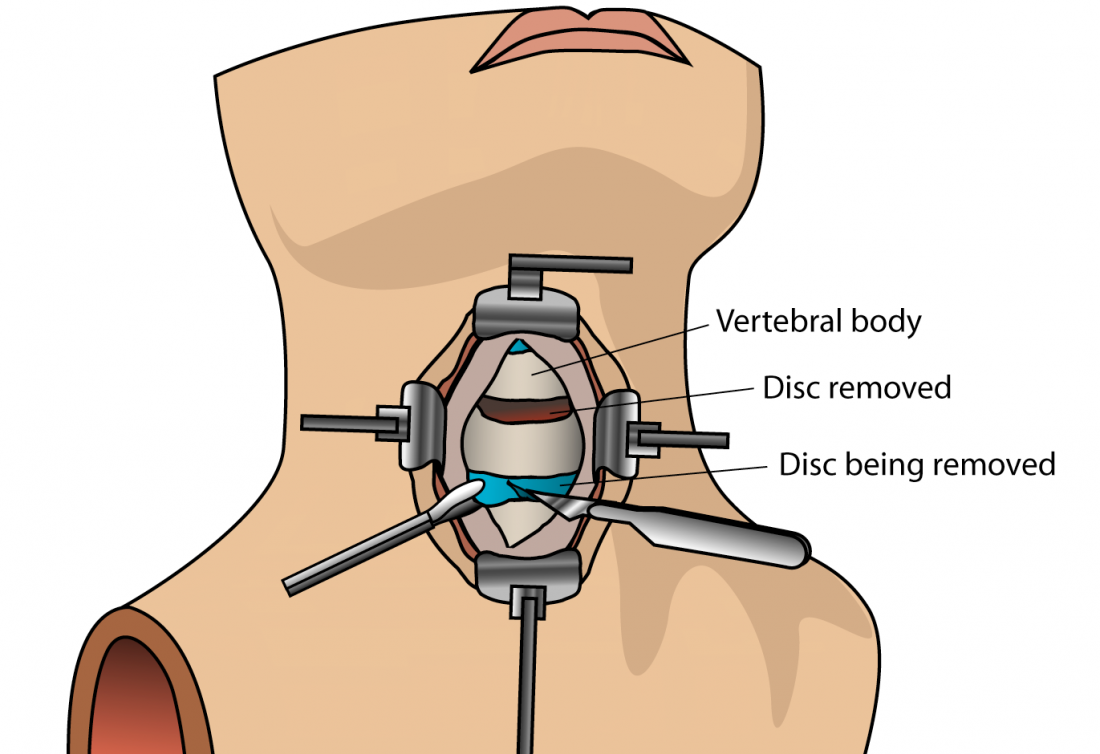
Disc removal
Your specialist cuts out the disc’s outer wall to remove about two-thirds of your disc using unique grasping tools and looks through a microscope to remove the remaining disc. The ligament running behind the vertebrae is removed to reach the spinal canal. Your surgeon removes any disc material pressing on your spinal nerves.
Nerve decompression
The surgeon removes bone spurs pressing on nerve roots and enlarges the foramen where the nerve exits with a drill. This process gives the nerves enough room to go into the spinal canal.
Preparations of a bone graft fusion
Using a drill, your surgeon prepares the open disc above and below by removing the outer layer of bone, exposing the cancellous bone. This invented part will hod the bone graft you selected.
- Bone graft from your hip: Your specialist makes a skin and muscle incision over your hipbone crest. Your surgeon uses a chisel to cut through the cortical bone to the cancellous bone and shapes your bone graft to place it in the invented area between the vertebrae.
- Bone fusion cage: Your doctor fills a cadaver bone graft with leftover shavings of a bone containing bone-growing cells and proteins. The graft is held into the shelf space and reinforced with a metal plate to enhance stability during fusion. An x-ray can help to clarify graft, plate, and screws’ positions.
Closing of the incision
Your surgeon removes the spreader retractors, sutures the muscles, and cuts the skin together. Biologic blue is finally placed across the incision. Your doctor will monitor your blood pressure, heart rate, and respiration and manage any pain after you wake up after the procedure.
Making sure you follow your surgeon’s instructions while at home will promote fast and effective recovery. Schedule an appointment at Polaris Spine & Neurosurgery Center to learn if your condition qualifies for a discectomy and fusion surgery.